CLICK HERE FOR FREE BLOGGER TEMPLATES, LINK BUTTONS AND MORE! »

Sunday, October 2, 2011

Fantabulous Cricut Challenge #79

Over at Fantabulous Cricut the challenge this week is "Leaves are Falling". Here is my submission for the challenge.


 The border frame and layers come from Pooh and Friends.
The tree and leaves come from Paper Doll Dress-Up.
Base layer is embossed using the swirls Cuttlebug folder.
I inked around all of the edges of the leaves. The card measures 5x5.
Sorry the pics aren't that great. I have bad lighting.

I hope you all enjoy the card!!

Tuesday, September 27, 2011

A Few of My Favorite (Crafting) Things

A Few of My Favorite Things


A few of my favorite things!
Purple (Plum) Cricut


I found my Cricut on clearance at Walmart for $99. I was soooooo excited!!! I had the green one, but wanted the purple one. Purple is my favorite color.


Zig Two-Way Glue-


Ok, who doesn't love this stuff?! It's so versatile.

Pink ATG Gun-


Adhesive on a big roll on a big gun!! LOVE IT!!!

Well, that's three of my favorite things. What about you?

Thursday, September 15, 2011

Fantabulous Cricut Challenge #77

Over at Fantabulous Cricut this week’s challenge is all about music! I LOVE music!!
I wanted to use a cartridge that I don't really use all the time. I used Summer in Paris. I really like the cuts on this cart even though there are not that many images on it.

The finished product. 


I used a clear glitter pen to highlight all the swirls on the piano lid. I hope you can see it!


Monday, September 5, 2011

Butterfly Basket

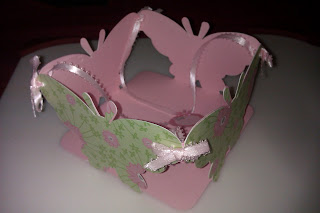
I created this basket for the challenge over at Cricut CraftRoom Blog. I used CCR to design and cut the basket out. It was so easy to do! I finally have been able to log in and start playing with it. I used the Paisley, Walk in My Garden and Classic Font cartridges to make the box. I made the completed design fit the entire page, so I don't know exact measurements, but the bottom of the box is 5 1/4 x 5 1/4. The design included the tabs to adhering the box together on the wings of the butterflies.  After I cut the entire shaped design out, I copied the butterflies only and cut them separate to attach to the side of the box.


This is the finished product. I am very happy with the way it turned out. I used a corner punch to round the edges of the bottom so that it had a softer look and feel to it than pointy edges.


I punched a hole in the wings on each corner with a paper piercer and ran ribbon through both to tie a small bow.

I attached two ribbons to make a handle so that the box can be carried. At the top is a little tag that you can write someones name on. 


Looking at box from the side.


This was a fun project and I think I will be making more of these with different shapes in the future. These would really make cute favors (on a smaller scale) or gifts for the ladies who I work with. 


Thanks for looking everyone!


Wednesday, August 31, 2011

Fantabulous Cricut Challenge #75

Hi everyone! It's been awhile since I've posted, but I had some time tonight and thought I would share with you all. Over at Fantabulous Cricut the weekly challenge is to use the color yellow in any project. Here is my submission. 


The lighting is really bad, but the card is so cute! I like how it turned out.


Monday, July 18, 2011

My Pink Stamper Design Team Call

I created this card for the for a chance to be on My Pink Stamper's design team. The challenge was to make a card, scrapbook page or other Cricut project with your favorite Cricut cartridge using orange, green, turquoise and brown and any other color you like. 


Recipe for the card:

Create a Critter cartridge
The Paper Studio- scrap pack for bird- cut at 4"
Paper Reflections variety pack for card base
DCWV- The Far East Pack for patterned paper
ATG gun
Gellyroll- Sakura glitter pen
Inkadinkado Stamp sentiment- Love Letters-
Studio G ink pad in chocolate
American Crafts Ribbon- "Teen" pack

Card measures 4x6

I hope everyone likes it. I hope you like it too Robyn!
 

Monday, April 11, 2011

Umbrella Spring Card & Video

Hi everyone! This is my very first video!

I hope everyone likes it and leaves me a comment. The lighting wasn't all that great but I will tweak it as I get more of these videos done.


Leslie

Friday, April 1, 2011

Simple Spring Card

Just a quick card I made to welcome Spring in.


Sunday, March 27, 2011

Accordion Book

 I learned how to make an accordion book this weekend and wanted to share with everyone the one I made.
I love black and white together. It looks so sophisticated! (I'm not BTW!) Butterflies are my favorite, so of course I had to include one on the cover.


When you open the card, the back cover is the patterned paper.


The rest of the album.


The inside is all white.
You can add any pictures or little notes..anything you want really to the inside. I am going to add pictures of me and my children to ours. It will make a nice little keepsake and a remembrance for us all.

It's really simple to make. For instructions and a video go to mypinkstamper.com

Monday, March 14, 2011

Fantabulous Cricut Blog Hop Entry

The challenge for today was to do a square card using the colors green and gold. Here is my entry.

Owl cut from the Paisley cartridge at 2.75


Saturday, March 12, 2011

Creating My Own Embossing Folders

I decided I would post my custom made embossing folders that I made this evening. I bought two kits at Hobby Lobby on clearance about a month ago and never did anything with them until now. I am so happy with how they both came out.

The directions are pretty straight foward, but I looked at a Youtube video. I'm more of a visual person.


This is the first one I did. Big butterflies! It was so simple to do. I used cardstock instead of the sheet it came with and it turned out great.


Here is what the embossed image looks like.


For the second one, I used the Paisley cartridge with the image on page 48 layer 2. I used DS to get them all together and for the correct dimensions. I think I like this one even more! Again, I used cardstock instead of the sheet that was provided. I was too afraid I would mess them up! You can always redo with cardstock, not so much with the sheet.


Embossed image of second folder.


Close up image of second folder.

I now have two folders that I can use for my spring cards!!


Robyn's Blog Hop Entry

Challenge: Spring

This month the challenge was to create something Spring related. This is my first time doing a challenge for a blog hop and I thought what better place to start than at Robyn's great website mypinkstamper.com


My lighting isn't that great, but I think you can tell what it looks like. My upper left hand corner of the card got a little crumpled :(

Close up of butterfly. I used adhesive bling for the eyes.

A wide shot of the card.

Ingredients:
Recollection cardstock for card base in white
g.c.d sudios eye candy paper pack (at Big Lots $5!!!)
the paper studio scrap pack for butterfly and mount
k i memories adhesive ribbon pack


Monday, February 21, 2011

Flower Card from Wild Card

My son asked me to make him a card for one of his friends.
I love the paper pack I used. It's in the Eye Candy pack from g.c.d studios

Tuesday, January 25, 2011

Butterfly Card using Paisley cartridge


I made this card after I seen Christina at creationswithchristina.com make one. I really like her blog and have seen a few of her videos. I ended up giving this one to my oldest sister.

Saturday, January 22, 2011

Umbrella Card using Paisley cartridge

This card was really easy to make. I used the Paisley cartridge with my Cricut to cut. The embossed cardstock was done using the cuttlebug folder. Sorry my lighting isn't that great. Please let me know what you think in the comment section below.